How to Calculate Production Costs Without Killing Your Profits

Knowing your numbers is the bedrock of a profitable custom woodworking shop. To really calculate production costs accurately, you need to look beyond the obvious and sum up your direct materials, direct labor, and all that manufacturing overhead. Get this right, and every beautiful piece you build will also be a financial win.
The True Cost of Creation Beyond Wood and Screws
Stop guessing. In this business, guesstimates are a fast track to going broke. If you're building custom work, a vague sense of your costs just won't cut it. This guide is all about giving you a solid framework to make sure you account for every single penny.
Look, understanding your production costs isn't just some boring accounting exercise—it's the key to staying in business and actually growing. Without a firm grip on what a job truly costs to produce, you're flying blind. You can feel busy all month long, with sawdust flying and projects heading out the door, only to find there’s no real profit to show for it.
The Three Pillars of Production Costing
Every single project, whether it's a simple cutting board or a full-blown kitchen renovation, breaks down into three fundamental cost categories. Get one wrong, and it can throw your entire financial picture out of whack.
Before we dive deep, let's get a bird's-eye view of these three pillars. Think of them as the legs of a stool—if one is weak, the whole thing topples.
The Three Pillars of Production Costs at a Glance
| Cost Category | What It Really Means | Examples for a Custom Cabinet Job |
|---|---|---|
| Direct Materials | Anything that physically goes into the final product. | Plywood for the boxes, walnut for the doors, drawer slides, hinges, screws, finish, wood glue. |
| Direct Labor | The hands-on time your team spends making the product. | Hours spent cutting panels, assembling cabinets, sanding, applying finish, and installation time. |
| Manufacturing Overhead | The cost of keeping the lights on and the machines running. | Shop rent, electricity bill, saw blade sharpening, CNC maintenance, insurance, software subscriptions. |
Getting a handle on these three areas is the first, most critical step toward predictable profitability.
Think about a custom cabinet job for a second. A small miscalculation on the board feet of walnut might not seem like a big deal. But then you underestimate the time it takes for a flawless finish and completely forget to account for the electricity your CNC router chewed through.
Just like that, your profit margin disappears. What started as a passion project has turned into a financial drain.
For a small shop, even a 10% error in costing can be the difference between investing in that new table saw you need and struggling to make rent. Precision isn't just a nice-to-have; it's everything.
The goal here is to get you out of the habit of "ballparking" and into a system you can rely on. We're going to break down each of these pillars with real-world examples, showing you exactly how to calculate your production costs with confidence. This is how you create quotes that protect your business, impress clients with your professionalism, and ensure every piece you craft actually contributes to your bottom line.
Calculating Direct Material Costs: The Foundation of Your Quote
The cost of your materials might seem straightforward, but it’s often the place where profit margins quietly erode. To properly calculate production costs, you have to look far beyond the price on the lumber invoice. If you get this wrong, your entire quote is built on a shaky foundation.
We're moving past simply adding up receipts here. True material costing means accounting for the gritty details that experienced makers learn the hard way—usually through lost profits. This means tracking waste, shipping fees, and unpredictable price swings.
Accounting for Waste and Offcuts
When you build a custom walnut dining table that needs 50 board feet of finished material, you don't just go out and buy 50 board feet. You always buy more to account for milling, knots, defects, and the inevitable offcuts. That gap between what you purchase and what ends up in the final piece is your waste factor, and it's a very real cost.
For hardwoods, a waste factor of 20-30% is a safe starting point, though this can shift depending on the lumber quality and project complexity. Ignoring it is like giving away wood for free on every single job.
Pro Tip: Figure out the material needed for a project, then multiply it by your shop’s historical waste factor (e.g., 50 BF x 1.25 for a 25% factor). If you don't have a historical number, start with 25% and track your actual usage to refine it. This one habit will dramatically sharpen your quoting accuracy.
Let's apply this to that custom walnut table. The design calls for 50 board feet of usable walnut.
- Lumber Needed: 50 BF
- Waste Factor: 25%
- Total to Purchase: 50 BF * 1.25 = 62.5 BF
If walnut costs $12 per board foot, you're not costing $600 in lumber; you're costing $750. That $150 difference is pure profit if you account for it, and a direct loss if you don't. For more on pricing strategies, you can explore the articles over on the TimberCloud blog.
Factoring in Shipping and Price Volatility
The price you see at the supplier isn't your final cost. You also have to add in any freight charges to get those materials to your shop. For a small shop, a $100 delivery fee on a $1,500 lumber order adds nearly 7% to your material cost. This "landed cost" is your true starting point.
To get this right, it helps to understand terms like the Ex Works (EXW) price definition, which defines the baseline cost before shipping is even in the picture. It gives you a much clearer view of your total material outlay.
On top of that, material prices are rarely stable. Supply chain hiccups, tariffs, and demand swings can cause prices to spike between when you quote a job and when you buy the materials.
In fact, many manufacturers are bracing for input costs to rise, with some analyses citing an average increase of 5.4% over the next year. It’s smart to build a buffer of 5-10% into your material estimates to absorb these potential shocks and protect your margins.
Building a Complete Material Cost List
Let's finalize the material cost for our walnut dining table. Don't forget the small stuff; it adds up faster than you think.
- Walnut Lumber: 62.5 BF @ $12/BF = $750.00
- Inbound Freight: Prorated share of a larger order = $50.00
- Fasteners & Hardware: Specialty bolts and inserts = $45.00
- Wood Glue & Adhesives: High-quality PVA glue = $20.00
- Sandpaper: Various grits for finishing = $25.00
- Finishing Supplies: Oil or hardwax finish = $60.00
Your total direct material cost isn't just the $750 for wood. It's the sum of everything that physically goes into the piece.
Total Direct Material Cost: $950.00
This number is the first solid block in building your final price. It’s accurate, defensible, and ensures you’ve covered every single material expense before you even start thinking about labor or overhead.
Mastering Direct Labor Costs: How to Value Your Time and Skill
Let's get one thing straight: your labor is so much more than an hourly wage. It’s the cost of your expertise, your efficiency, and every minute your team pours into bringing a client's vision to life. If you want to calculate production costs accurately, you have to build a system that captures the full value of that time.
So many shops fall into the trap of using an employee's take-home pay as their labor rate. This is a massive mistake, and it’s likely costing you a fortune. Your real labor cost is the wage plus all the "extras" that come with employing someone—or even paying yourself.
This is your fully-loaded labor rate, often just called the "shop rate," and it's the only number you should ever use in your quotes. Period.
Building Your Fully-Loaded Shop Rate
To get to this number, you need to add up all the direct costs tied to an employee for a specific period, then divide that total by the number of hours they actually work on projects. This rate is the bedrock for costing out any job with confidence.
Here’s a look at what goes into that calculation:
- Gross Wages: The employee's base hourly pay before any deductions.
- Payroll Taxes: Your share of FICA (Social Security and Medicare) and federal/state unemployment taxes (FUTA/SUTA).
- Workers' Compensation Insurance: A non-negotiable cost that varies by state and risk level but is a direct expense tied to labor.
- Benefits: The cost of health insurance, retirement contributions (like a 401k match), or any paid time off you offer.
Let's walk through a realistic example for a skilled woodworker on your team.
- Hourly Wage: $30.00
- Payroll Taxes (estimated 15%): $4.50
- Workers' Comp (estimated 5%): $1.50
- Benefits (prorated per hour): $4.00
In this scenario, your Total Hourly Cost to have this person on the floor is $40.00, not $30.00. If you were using their wage to quote jobs, you’d be undercharging by a whopping 25% on every single hour they work.
Tracking Time From Setup to Finishing
Once you have a solid shop rate, the next hurdle is tracking time with precision. This means getting serious about separating billable hours spent directly on a client's project from non-billable time, which gets absorbed into your overhead.
And remember, billable time isn't just when the sawdust is flying. It includes:
- Setup and Preparation: Reviewing plans, building jigs, and calibrating machines for a specific job.
- Fabrication and Assembly: The core hands-on work of cutting, joining, and building.
- Finishing: Sanding, applying stains or finishes, and waiting for cure times. This is the step everyone underestimates.
- Installation: Time spent on-site getting the piece dialed in perfectly.
A classic pitfall is underestimating the finishing process. I've seen complex, multi-coat finishes take just as much hands-on labor as the initial fabrication. Always track it separately so you can refine your estimates for the next job.
Let's imagine a two-person crew is building and installing a set of built-in bookshelves. The lead craftsperson has a shop rate of $50/hour, and their apprentice is at $30/hour. They track their time for each phase of the project like pros.
Real-World Labor Calculation: Bookshelves
| Project Phase | Lead Crafter Hours (Rate: $50/hr) | Apprentice Hours (Rate: $30/hr) | Phase Labor Cost |
|---|---|---|---|
| Setup & Fabrication | 16 hours | 20 hours | $1,400 |
| Sanding & Finishing | 12 hours | 12 hours | $960 |
| On-Site Installation | 8 hours | 8 hours | $640 |
| Total Labor | 36 hours | 40 hours | $3,000 |
By breaking down the project and using their fully-loaded rates, the shop can confidently bill $3,000 for labor, knowing every cost is covered. This is the only way to make sure each hour worked actually moves your business forward.
Nailing these labor dynamics is especially important when you consider broader economic trends. Recent data shows that in manufacturing, unit labor costs are on the rise because hourly compensation is growing faster than productivity. For shops trying to calculate production costs, this means even a small wage increase without a matching jump in efficiency can squeeze your profit margins thin.
This makes accurate labor tracking more critical than ever. You can dig into the full report on these labor cost trends to see how this might affect your business. It just reinforces why a precise, fully-loaded rate isn't just good practice—it’s an essential defense for your profitability.
Allocating Overhead: Taming the Hidden Costs That Sink Profits
Let's talk about the silent killer of profitability: overhead.
You can easily track the cost of lumber and the hours your team spends on a project. Those are tangible. But what about the rent for your shop? The electricity that powers your CNC? The salary for the person handling the books? These are your overhead costs, and they are just as real and just as critical as the materials you use.
If you ignore them, you're not just miscalculating your costs; you're essentially subsidizing your clients' projects out of your own pocket. Every job that leaves your shop must carry its fair share of the financial weight required to keep the doors open. Fail to account for this, and you can find yourself incredibly busy but inexplicably broke.
First, What Are Your Shop's Overhead Costs?
Before you can allocate anything, you have to know what you're dealing with. The first step is to simply get everything down on paper. Think about every single dollar you spend in a month that isn't for specific project materials or direct, hands-on labor.
Your list will likely include a mix of fixed and variable expenses, such as:
- Shop Rent or Mortgage: The non-negotiable cost of your physical space.
- Utilities: The whole lot—electricity, water, gas, and internet.
- Insurance: Crucial business liability and property insurance.
- Software Subscriptions: CAD programs, accounting software, or shop management platforms like TimberCloud.
- Consumables: The little things that add up, like saw blades, sandpaper, glue, and other shop supplies not billed directly to a job.
- Tool Maintenance & Repair: The budget for keeping your equipment running smoothly and safely.
- Indirect Labor: Time spent on non-billable (but essential) tasks like shop cleanup, quoting new projects, or client meetings.
- Property Taxes: If you own your building.
To get a truly comprehensive picture of what it costs to run your operation, it’s vital to know how to calculate operating expenses accurately. This forms the foundation of your entire cost structure.
Calculating Your Overhead Allocation Rate
Once you have a grand total for your monthly overhead, you need a logical way to spread that cost across all your projects. For most custom shops, the most straightforward and effective method is to tie overhead to your direct labor hours. This gives you an overhead allocation rate.
The formula itself is simple:
Total Monthly Overhead ÷ Total Monthly Billable Labor Hours = Overhead Rate per Hour
This calculation gives you a concrete dollar amount to add to every single billable hour. It’s the magic number that ensures the time spent building a project is also time spent paying to keep the lights on.
Let's walk through a real-world example for a small, two-person shop.
A Worked Example: A Small Woodworking Shop
Imagine your shop’s total monthly overhead—rent, utilities, insurance, software, etc.—adds up to $4,000.
Next, figure out your total billable hours for the month. Be realistic here. Not every hour at the shop is spent directly on a client's project.
- Owner: Works 40 hours a week, but after handling admin and sales, only about 120 hours are truly billable to projects.
- Employee: Also works 40 hours a week, with around 150 billable hours after accounting for cleanup and non-project tasks.
- Total Billable Hours: 120 + 150 = 270 hours per month
Now, we can plug those numbers into our formula to find the overhead rate.
$4,000 (Overhead) ÷ 270 (Labor Hours) = $14.81 per hour
For the sake of clean math, let’s round that up to a nice, even $15.00 per hour. This is your overhead allocation rate. Think of it as a "shop tax" that every billable hour must contribute to cover the business's background costs.
So, if your fully-loaded labor cost for an employee (wages, taxes, benefits) is $40 per hour, your true cost to the business isn't $40. It's actually:
$40 (Labor) + $15 (Overhead) = $55 per hour
That $55 is your break-even number—before you've added a single penny of profit. Basing your quotes and pricing on this solid foundation is the only way to build a sustainably profitable business.
Choosing Your Overhead Allocation Method
While allocating overhead based on labor hours is common and effective, it isn't the only way. The best method for your shop depends on your specific operations—whether you're more labor-intensive or machine-intensive.
Here's a quick breakdown of the most common approaches to help you decide which one fits your business best.
| Allocation Method | How It Works | Best For | Potential Drawback |
|---|---|---|---|
| Direct Labor Hours | Divides total overhead by total billable labor hours. | Shops where most work is done by hand; labor is the primary cost driver. | Can be inaccurate if some jobs are machine-heavy and others are labor-heavy. |
| Machine Hours | Divides total overhead by total machine run-time hours. | CNC-heavy shops where machinery is the biggest cost and production bottleneck. | Tracking machine hours can be complex without the right software. |
| Percentage of Direct Costs | Calculates overhead as a percentage of the total material and labor costs. | Businesses with very consistent job types and predictable cost structures. | Can skew pricing on jobs with unusually expensive materials. |
| Per-Project Basis | A flat overhead fee is applied to every project, regardless of size. | Shops that produce very similar, repeatable products or services. | Unfairly burdens small, simple jobs while under-pricing large, complex ones. |
Choosing the right method isn't just an accounting exercise; it's a strategic decision. The goal is to distribute your overhead costs as fairly and accurately as possible across all the work you produce, ensuring every project is priced for real-world profitability.
Putting It All Together: From Raw Costs to a Profitable Price
Alright, this is where it all comes together. We’ve been digging into the nitty-gritty of materials, labor, and overhead, pulling them apart piece by piece. Now, we’re going to assemble them into a complete, bulletproof production cost that will be the foundation for every quote you send out.
Let’s run through a real-world example I see all the time: a custom kitchen island. This kind of project is perfect because it has it all—a mix of materials, a good chunk of labor, and it hits every part of the production process. We’ll build this quote from the ground up, just like you would in your own shop.
Building the Quote: A Custom Kitchen Island
First things first, let's get our direct material costs sorted out. And remember, this isn't just the wood; it's everything, including the inevitable waste.
- Maple for the Base: We'll need 45 board feet (BF). I always add a 25% waste factor, so that's 56.25 BF. At $9/BF, that comes to $506.25.
- Walnut for the Top: For this, we need 30 BF. I'll budget 20% for waste, bringing us to 36 BF. At $14/BF, the total is $504.00.
- Drawer Hardware: The client wants high-end soft-close slides and pulls, which will run us $220.00.
- Consumables: Don't forget the small stuff! Glue, sandpaper, fasteners, and finish add up. Let’s budget $85.00.
Add it all up, and our Total Material Cost is $1,315.25. That's our starting number.
Next up is labor. We’ll use our fully-loaded shop rate of $55/hour (that’s the $40 for labor plus the $15 we calculated for overhead) and multiply it by the estimated hours for each stage.
- Fabrication & Assembly: I'm estimating 40 hours. At $55/hr, that’s $2,200.00.
- Finishing & Curing: This is a multi-step process. Let's block out 15 hours, coming to $825.00.
- On-Site Installation: Figure 8 hours for transport, setup, and cleanup. That's another $440.00.
This gives us a Total Labor & Overhead Cost of $3,465.00.
Now we have all the pieces. Let’s see what our actual cost to produce this island is.
Total Production Cost = Total Materials + Total Labor & Overhead $1,315.25 + $3,465.00 = $4,780.25
That number, $4,780.25, is your break-even point. It's the absolute rock-bottom price you can charge just to cover every single expense, without making a dime of profit.
The flowchart below is a great little reminder of how we got that overhead rate, which is a key part of this whole equation.
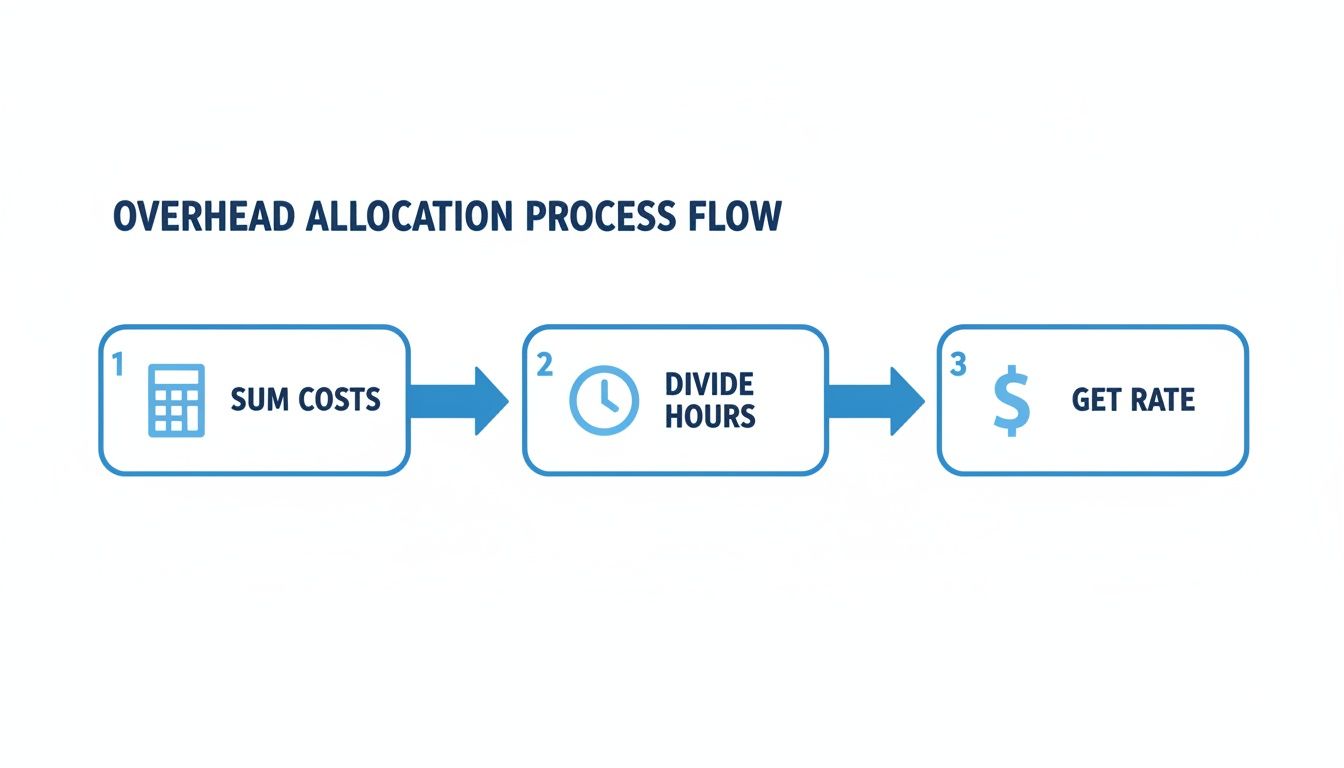
It’s a simple visual, but it drives home the point: you add up all those indirect costs, divide them by your actual working hours, and get a rate that ensures every project pays its fair share of the bills.
From Cost to Price: Adding Your Profit Margin
Now for the part that actually pays you for your expertise and risk: adding the profit. A tried-and-true method is cost-plus pricing, where you tack on a percentage markup to your total cost. For custom work, a healthy markup is anywhere from 30% to 50%.
Let's apply a 40% markup to our island.
- Profit: $4,780.25 x 0.40 = $1,912.10
- Final Customer Price: $4,780.25 + $1,912.10 = $6,692.35
I’d round that up to a clean $6,700 for the final quote. This price doesn't just cover your costs—it ensures you're earning a respectable profit for your skill and effort.
Of course, there’s also value-based pricing, where your price is more about what the work is worth to the client than what it cost you to make. If your brand is strong and you’re in high demand, you can definitely command higher prices. But even then, you absolutely must know your production cost. It’s your safety net.
These numbers don't exist in a vacuum, either. Broader economic trends play a huge role. For instance, recent industry reports show machinery costs jumped nearly 10% in 2023, which directly impacts the fixed-cost part of your overhead. Accurately tracking these kinds of variables is what separates the shops that thrive from those that just survive.
This is where having the right tools can be a game-changer. Managing all these moving parts manually is a headache. Exploring the features of a platform like TimberCloud shows you how modern shops are connecting sales and production with things like live inventory, automated cut sheets, and dynamic pricing. It’s all about making sure your quotes are always built on solid, up-to-the-minute data.
Common Questions About Calculating Production Costs
As makers, we pour our energy into the craft. We live for the feel of the wood and the satisfaction of a perfect joint. But if we're not just as focused on the numbers, we risk turning a passion into a costly hobby. I've been there.
Here are some straight-up answers to the questions I hear most often from fellow shop owners who are trying to nail down their production costs. These aren't textbook definitions; they're hard-won lessons from the shop floor.
How Do I Cost a Completely New Custom Product?
When you’re staring at a blank design with no historical data to lean on, the only way forward is to break it down. Deconstruct the entire project into its smallest possible components.
Don't just estimate "lumber." Get specific. List every single board foot, every screw, every biscuit, and every drop of glue. Research the current market price for each item, and then tack on a 10-15% contingency buffer. Trust me, you'll need it for waste, a bad board, or that one specialty hinge you forgot about.
For labor, you have to build the piece in your head before you ever make a cut. Walk through every single step, from milling the rough stock to sanding between coats of finish. Be brutally honest—and even a little generous—with your time estimates. It’s always better to pleasantly surprise a client by coming in under budget than to ask for more money later. On that first build, track everything.
Your first quote on a totally new product is an educated guess. The meticulous data you gather during that build transforms your next quote from a guess into a precise calculation.
What Is the Difference Between Production Cost and COGS?
This one trips people up all the time, but the difference is critical for knowing if your business is actually healthy. They're connected, but they tell two very different stories about your money.
Production Cost is what it costs you to create a product, period. It includes every penny spent on materials, labor, and overhead for that item. The product could be sitting on your shelf or in the customer's home—that cost is fixed.
Cost of Goods Sold (COGS), on the other hand, is the production cost of only the products that you have actually sold within a specific timeframe (like a month or a quarter).
Let's say you build ten identical tables in March, and your production cost for each is $1,000. Your total production cost for the month is $10,000. If you only sell seven of them by March 31st, your COGS is $7,000. The other $3,000 sits on your balance sheet as inventory.
Think of it this way: Production Cost is for "making," and COGS is for "selling."
How Often Should I Update My Labor and Overhead Rates?
Your costs are not set in stone. They're living numbers that shift with the market and your business operations. At a bare minimum, you need to do a deep-dive review of your labor and overhead rates once a year.
But the real pro move? Re-evaluate them any time a major business expense changes.
- Did your shop rent just go up?
- Did you hire a new finisher or give everyone a well-deserved raise?
- Did your liability insurance premium jump?
- Have your utility bills been creeping up?
Any of these events should trigger an immediate recalculation of your rates. Material costs, of course, need to be checked far more often—ideally for every single quote. Fresh numbers are the only way to protect your profit. To see how software can automate this, you might be interested in exploring the various pricing plans that can help manage these dynamic costs.
What Is a Good Profit Margin for Custom Work?
There's no single magic number here. It depends on your market, the reputation you've built, your skill level, and what you need to live on. That said, for most custom woodworking and manufacturing businesses, a healthy net profit margin usually lands somewhere between 15% and 30%.
Don't just pull a number out of thin air. The right way to do this is to first calculate your total production cost with surgical precision. Profit is what you add on top of that break-even number.
A common and very solid starting point is to apply a 50% markup to your total production cost. This gives you a 33% gross margin, which is a strong, defensible position for most custom jobs. From there, you can adjust up or down based on the project's complexity, your relationship with the client, and how busy your shop is. Just remember to always price for profit, not just to cover your costs.
At TimberCloud, we build tools that take the guesswork out of costing so you can focus on your craft. Our platform helps you manage inventory, automate cut sheets, and generate dynamic pricing that ensures every project is profitable. Learn more at https://timbercloud.com.
Topics
TimberCloud Team
Content Team
The TimberCloud team is dedicated to helping manufacturers streamline their operations with intelligent software solutions.